Wednesday, March 21, 2018

More March DT Inspiration for 49 and Market
Featuring the NEW LASER CUTS
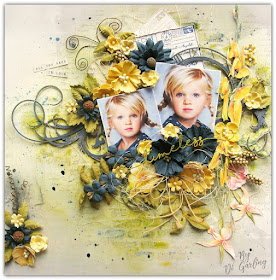
"Timeless"


Hi there 49 and Market fans.
Today I have some more inspiration using the wonderful
 49 and Market products.

49 and Market Products Used...
"Dandelion Fields" Laser Cuts
"Captured Adventures" - "Eclectic Pieces" paper
Stamp - "Gabbi's Postcards From Paris" stamp set (postcards)
"Vintage Shades Potpourri" flowers in yellow
"Botanical Blends" flowers  in Navy
"Single Ply Jute Cording"

2Crafty Chipboard Products Used...
Carita's Swirl
Fine Word Set #1
6" Skeleton Clock Frames


A tiny bit of mixed media on my background to showcase the beautiful colours of
 those flowers. This "Captured Adventures" paper collection is the perfect background
 for any sort of layout as it has lots of really subtle details.


I really LOVE these yellow & navy blue flowers from 49 and Market teamed
 together & combined with the green foliage pieces that also come in the pack.


Now the star of this layout has to be their NEW LASER CUTS. You can see at the right side
 of my photos those gorgeous yellow flower sprays, that is some of the laser cuts & I 
didn't even have to fussy cut them out !!

I have also stamped a couple of little postcards with their
"Postcards from Paris" stamp set & I have layered them in behind my photos.


Here you can see more of those fabulous LASER CUTS. 
Definitely my new favourite go to product. !!

All of the chipboard I have used here is from 2Crafty Chipboard.


Love this combination of the yellow & navy flowers & also all the different styles
 & shapes of flowers in each pack. I have also added a nice jute bow underneath the 
bottom flower cluster to add to all the textures. 

Well thats all from me today. I hope I have inspired you to try out
our NEW LASER CUT embellishments too.

Until next time.


Monday, March 19, 2018

More March DT Inspirationfor 2Crafty Chipboard
Part Two
"Live Laugh Love"


Hi there friends, thanks for stopping by the blog.
Today I have decided to create a boy layout with a CIRCLE theme.
I have this fabulous new stamp set I wanted to use & 2Crafty
has so many great circle shapes so I just went for it.

 2Crafty Chipboard Used...
Live Laugh Love - title
6" Circle Stack
6" Circular Panel
6" Circle Revolution Frames


So I set about stamping lots of circles, heat embossed them in black
 & then coloured them up with some Lindy's sprays before cutting them out.
 
I have even used a few flowers from 49andMarket & sprayed them to match.
 

For the chipboard title "Live Laugh Love" I painted it with a Ranger
blue paint dabber & when dry rubbed on a little Finnabair Wax in copper.
 

All the chipboard circles & frames were coloured up with the same
Finnabair Art Alchemy Metallique Wax In "Metallic Copper".
These wax pastes are so easy to use & cover really well too, I just used my finger !!


As you can see in the above photo I cut a few pieces of the 
"Circular Panel" up & poked them in here & there.
 

A little mixed media & some stamping on my background & I even tied
 some string around the layout too, a great way to add extra texture !!

 
Well thats all from me today, I hope you liked my layout.
I will see you back here again soon with more.
 
If you like my layout I would LOVE you to leave me a comment !!
Until next time...


Thursday, March 15, 2018

My 2Crafty Chipboard March DT Reveal
Part One
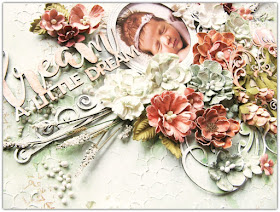
"Dream A Little Dream"


Hi there friends, thanks for stopping by. Today I have a layout 
to share that features my new baby grandaughter, isn't she just so beautiful?

 2Crafty Chipboard Used...
Dream A Little Dream - title
Thistle Shrub
Frame Maria's
Juliet's Hearts
Glenda's Swirl
 

I base coated all the chipboard pieces with a couple of coats of white acrylic paint.
 Then for the "Dream A Little Dream" title & also for the "Juliet's Heart" I simply 
brushed on a little Lindy's "Kissin Kenickie Coral" spray to create a watercolour effect.
 

In this photo you can see I have cut the "Thistle Shrub" into two pieces, left it raw,
& dabbed some glue on the ends & dipped them into some white Prills to
create a realist look. I was really happy how they turned out.
 

A closeup shop of the "Juliet's Heart" tucked in amongst the flowers.
I have  cut the "Glenda's Swirl" into two pieces, I also brushed a little bit of
Bundled Sage Distress Ink over it to add a touch of green. I tucked one piece in
at the bottom of all the flowers & the other piece in to the top right on the photo.
 

You can also see the gorgeous "Frame Maria"  
which is holding my photo, I just left that white.
 
 
All of these beautiful flowers & papers are from 49 and Market.
I will be back tomorrow with more. 
Until then.


Wednesday, March 7, 2018

My 49 and Market March Blog Post
Part One
"Sweet Cheeks"


Hi there friends, thanks for stopping by. Today I have a layout to share with you that
 I created using some of the NEW releases from 49 and Market.

This is the fabulous NEW “Captured Adventures” paper collection. 
I love the slightly grungy feel of this collection although it still has a lovely softness to it,
 & when teamed with some of our latest NEW release flowers, well a match made in heaven really.

If you were lucky enough to attend “Creativation” recently you may have seen
 this one up on the 49 and Market stand.


49 and Market Products Used….
Captured Adventures – “Vagary” paper (tags)
Captured Adventures – “Wander Aimlessly” paper (background)
Botanical Blends Flowers in Marina Blue


This layout features my beautiful Goddaughter & her little girl.

You can see I have used the “Wander Aimlessly” paper for my background. I just love
 all the lovely soft stamping & splotches etc that it has, saves you doing a whole lot of 
mixed media on it, it is already done for you.


"Sweet Cheeks" title
Mini Flourish Bits
"Frame Lucy's Flourish"
 

 All I have done to this background is add a few blue splashes of spray.


 These flowers are one of our NEW releases. Aren’t they beautiful? This colour is
 called “Marina Blue” & they come with the little seed spray & curly bits etc.


 For the little “definition” strip that is sitting across the top of my photo, well that is on
 the strip that comes on the bottom of the paper, so nothing is wasted & all very
 useable & another nice detail to add to the layout !!


 Now for all the tags you can see here, I used the “Vagary” paper as it has some fabulous details 
on it & I just cut my tags out of the parts that had all this wonderful detail. Perfect for tags.


Hope you like my layout today & perhaps be inspired to try out some of the 
wonderful NEW products from 49 and Market too.

I will be back with more soon. Until then.